Privacy statement: Your privacy is very important to Us. Our company promises not to disclose your personal information to any external company with out your explicit permission.
![]() September 02, 2021
September 02, 2021
Now many people shop industrial sewing machines online, but they don't know how to assemble the table and stand. Today we offer the step by step instructions to walk you through. The sewing machine table and stand is a piece of the sewing machine that goes very hand in hand. It allows you to have a larger, more comfortable workspace than a simple handmade table.
Mostly, the models manufactured by some brands offer different versions for different purposes like commercial purposes (industrial sewing machines), hobbyist purposes (sewing machines), domestic purposes (domestic sewing machines). Some models may only feature one version rather than another but still, we can still divide them into three types namely commercial, hobbyist, and domestic. We are going to discuss the commercial type.

The purpose of this instruction manual is to guide you through setting up the sewing machine's table and stand, as well as its optional accessories such as the foot pedal and belt drive. Eventually, we create a working sewing machine workshop. You'll learn how to use the provided tools and successfully assemble your sewing machine table stand set.
The sewing machine table and stand are made from stainless steel and wood. These are the main materials that will be used for the construction. If you don’t have any of these materials, you can use plastic or cardboard as the material for your DIY project. You need to have something durable on your side when it comes to using these devices in your home. Moreover, these devices are also very sturdy so it won’t be a problem if you use them in your home.
There are some other accessories that come along with a sewing machine table and stand:
It’s important to keep in mind that when using any of these accessories, make sure everything is connected properly so that it functions properly! For example, The Sewing Machine Table Foot Pedal should always be connected directly into the motor (or into a powered transfer belt) without any misplaced splices or connections. Likewise, the metal spindle should be positioned so that it rests on the motor shaft so that there is no force being applied on either one. Any other type of connection may cause damage to your sewing machine table parts if not properly aligned.
This manual will help ensure all areas are fully capable of functioning at their best through proper assembly and maintenance! Do not disassemble or reassemble your sewing machine until this manual has been completed!
Usually, we simply need screwdrivers, a wrench, and a small power drill for the installation. Before we get into the assembling details, let’s have a look at a few of the most useful tools that you should have in your toolbox:
1) The Fabric Needle Threader / Threader Rack is your first and foremost accessory when assembling a sewing machine table and stand. It’s an indispensable tool for taking out the thread, fixing pins, and keeping them organized inconvenient places. It comes with three different thread lengths for each type of needle – 5/8″, 3/4″ and 1″ – so you can easily find the correct thread length for your project;
2) The Sewing Machine Table Cover is a great accessory when it comes to protecting your sewing machine table from dust particles or liquids;
3) A Sewing Machine Table Motor is an essential accessory that helps bring power to your sewing machine table. In cold weather or in inclement weather, this motor will help keep it running as well as draw heat from it. This motor runs on 12 volts DC so it can be powered by any standard household appliance;
4) A Sewing Machine Stand Power Cord is also an essential accessory when it comes to powering up your sewing machine table;
5) A Sewing Machine Stand Dust Cover is yet another useful product that goes well with the above accessories – cover dust created by the spinning of threads during sewn projects through the fabric cover during operation of sewing machines;
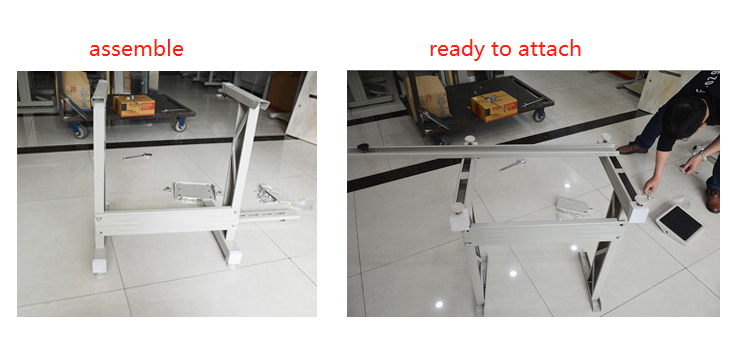
4. Step 1: Assemble the stand metal racks;
The sewing table and stand are essential parts of any sewing machine. It’s the first step in assembling your sewing machine. The following instructions will show you how to assemble your sewing machine stand.
The easiest way is to use a hand sander to sand the metal parts at the back of the stand. Then you can use a marker to mark where your 2 holes are located on one side of the stand, and the 2 holes on the other side of the stand.
Before assembly, you may want to clean out any dust that may have collected on any metal parts. When assembling, make sure not to over tighten screws or bolts because it could cause damage to metal parts, which can lead to rusting (or even it will cause it).
And you simply install the racks as the picture shows:

5. Step 2: Roll over the stand on the floor, mount the motor on the downside of the stand;
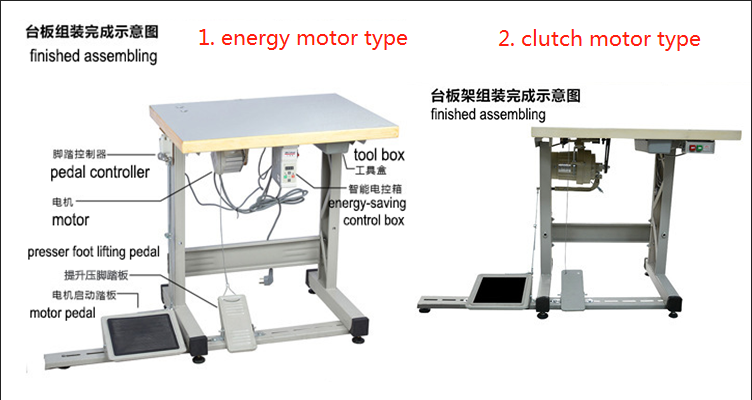
There will be a little difference between the energy-saving motor and clutch motor:
Energy-saving motor assembling: you have to take the motor and digital controller, especially the motor mounting set and pedal controller. It should be placed in the exact position. Then put them together with the help of a screwdriver. The motor is fixed by tightening the nut at the bottom side of the motor. Remark: turn off the power supply for the motor.
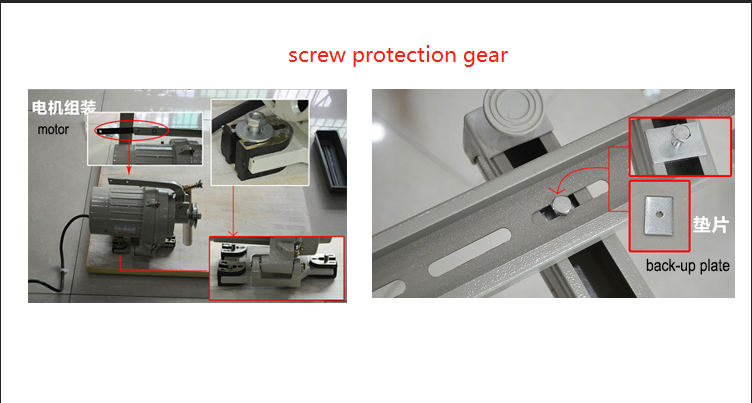
The clutch motor installation: this type is easier to do, just attach the motor with the cushion part according to the screw holes. Then install the clutch plate by using screws or nuts. The clutch plate has two sides, one side for the gear wheel and another side for the spring. You need to put them together so that they are not separated from each other.
During the installation, please noted that there are backup pads for the screws.

6. Step 3: Attach the stand and toolbox to the table, and turn over the table and stand;
The only way to assemble a sewing machine table and stand are to be patient, avoid making mistakes, and follow the step-by-step instructions in this tutorial. When the table is upsidedown, we simply connect screws to the stand.
Here Don't forget the toolbox, it's also attached under the table. It can hold all the tools you use when working on your sewing machines. If you don’t have any extra space at home, then you may want to buy an external storage box that will fit perfectly inside the toolbox. This will save some room for storing more things.
When finished, turn the table and stand up for the next step. And now we are almost done.
7. Step 4: Attach the pedal, toolbox, and foot controlling to the table stand, finish the assembling;
The final step will be assembling the pedals on the long extended metal beneath the sewing machine stand.
Now the finished item builds on our previous design and comes with all the necessary pieces, including a pedal, toolbox, foot controller, and a pedal-operated table stand. Here we check the parts:
the motor is mounted on the body of the table;
the metal feet are attached to the body of the table with screws;
the metal frame is attached to the foot control on top of the pedal;
and finally, we assemble everything together so that it can be used for both professional use and home use.
Now get your sewing machine table and stand assembled!
8. Conclusion: everyone can do it according to our instructions.
Ready to assemble your sewing machine table and stand? Here is the picture of a detailed guide about how to assemble your sewing machine table and stand.
How to assemble sewing machine table and stand for energy-saving motors or clutch motors? Are they the same operations?
Here we make a simple picutures to show you how to assemble:

Here we can see it’s operating in 3 major steps:
1. Attach motors and tool box under the table with screws;
2. Assemble table and stand, attached with pedals of presser foot lifting and motor;
3. Connect the above two parts together.
And as you can see in the pictures, the major difference is motors assembling, for energy-saving motor we have to attached the frame as the basement to hang the motor, and there’ll be extra controller for the motor, not simple on/off switch.
This tutorial should provide you with all the information to assemble your sewing machine table and stand, step by step. If you have any questions about the assembling or you need to buy any sewing machine with table and stand, please feel free to contact us anytime.
The above is the How to Assemble Sewing Machine Table and Stand we have listed for you. You can submit the following form to obtain more industry information we provide for you.
You can visit our website or contact us, and we will provide the latest consultation and solutions
Send Inquiry
Most Popular
lastest New
Send Inquiry
Send Inquiry

Mr. Alston Chen
Tel:86-769-18902616250
Fax:86-769-88285668
Mobile Phone:+8618902616250
Email:sales02@chuanghuisew.com
Address:26-28 Zhenglu south, chuancha village, Machong Town, Dongguan City, Guangdong Province., Dongguan, Guangdong
Related Products List
Mobile Site


Privacy statement: Your privacy is very important to Us. Our company promises not to disclose your personal information to any external company with out your explicit permission.

Fill in more information so that we can get in touch with you faster
Privacy statement: Your privacy is very important to Us. Our company promises not to disclose your personal information to any external company with out your explicit permission.